Photoshop Tutorials for Beginners: 7 How-To You Must Know


Designing with Adobe Photoshop is a matter of expertise. You heard it. No one do it with just going into the software without knowledge how it works. You might be here as you are stuck somewhere facing one of the issues below. Fret not! We prepare this Photoshop Tutorials for Beginners to help you tackle some of the most common but essential to-do for basically any design project. The steps were performed with Adobe Photoshop 2021 v22.0.0.35.
- How to Add Fonts to Photoshop
- How to Animate in Photoshop
- How to Resize an Image in Photoshop
- How to Make the Background Transparent in Photoshop
- How to Add Bleed in Photoshop
- How to Change Background Color in Photoshop
- How to Rotate the Image in Photoshop
To-Do #1: How to Add Fonts to Photoshop
Wondering how to add different font styles? In Photoshop, it is essential and a fundamental because pretty much every design project contains some text.
Steps:
- Open Photoshop.
- Go to file and choose ‘New’ if you wish to create a new project. If not, you can choose ‘Open’ to open an existing project.

- Go to the left sidebar and look for the big ‘T’ text box. Click it, then point your mouse to the page area where you wish to add your text.
- Then, you can double click the text and go to the top area to select the font type you like
- Save your work. To find out more about downloading more fonts and instructions for installing, check this Blog.
To-Do #2: How to Animate in Photoshop
Steps:
- Open Photoshop.
- Choose ‘Open’ to open an existing project.

- Click the Brush and choose the brush style.
- We recommend choosing the soft edges brush for better blending effect.
- Choose the brush size and opacity you prefer.
- Then click on Edit in Standard Mode (Q).
- Then apply the brush on some area that you want to apply animation with your mouse.
- When we apply the brush on some area, that area will be highlighted in RED.
- Then press Q .
- The area will be selected.
- Then go Select and choose Inverse. Again, the area that are selected is the one we want to animate.
- Press Ctrl+J to copy to a new layer.

- Then we create smart object of new layer.
- Go to window and click Timeline.
- Then click Create Video Timeline.
- The layers will show on time line.
- In this case, we will add animation on the water fall layer.
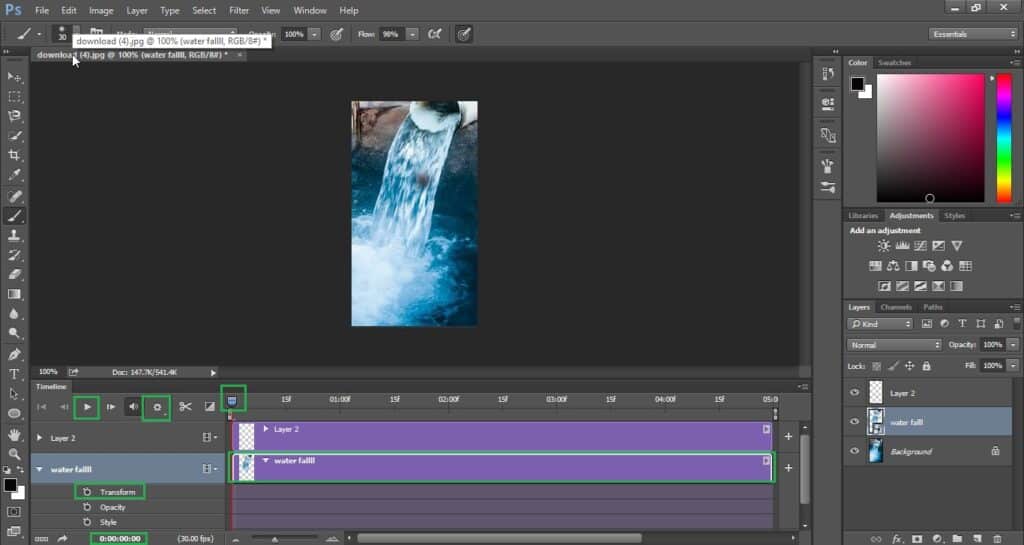
- Click on water fall layer which will open up three option.
- Check the slider.
- Slider must be on 00 position.
- Then click on Transform.
- Move the slider all the way to the right and press Ctrl+T.
- The area will be selected for resizing.
- Press Enter on your keyboard.
- Click on Play button or Space Bar on your keyboard.
- Click on Setting option and click on Loop Playback.
- Loop Playback allows the animation to repeats itself through the timer endlessly. Now we can see the water falling. Save your work.
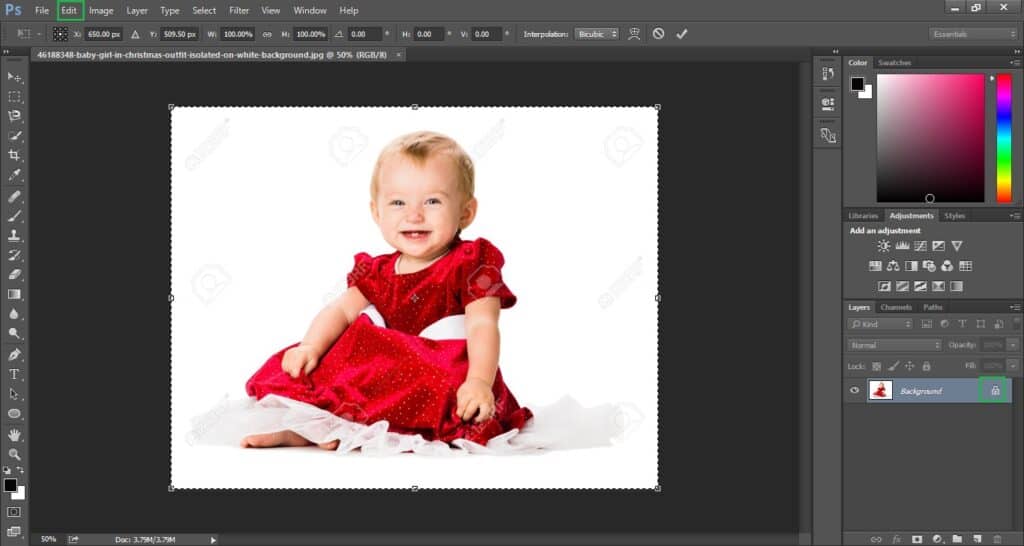
To-Do #3: How to Resize an Image in Photoshop
Another essentials for any print work! You will figure out how print size functions, how to resize your images so you can get the best for your printing anytime!
Steps:
- Open Photoshop.
- Choose ‘Open’ to open an existing project.
- Go to Image and click on Image Size.
- Key in your desired height and width according to whichever measurements. E.g. inches, milliliter etc.

- Then click on OK. Save your work.
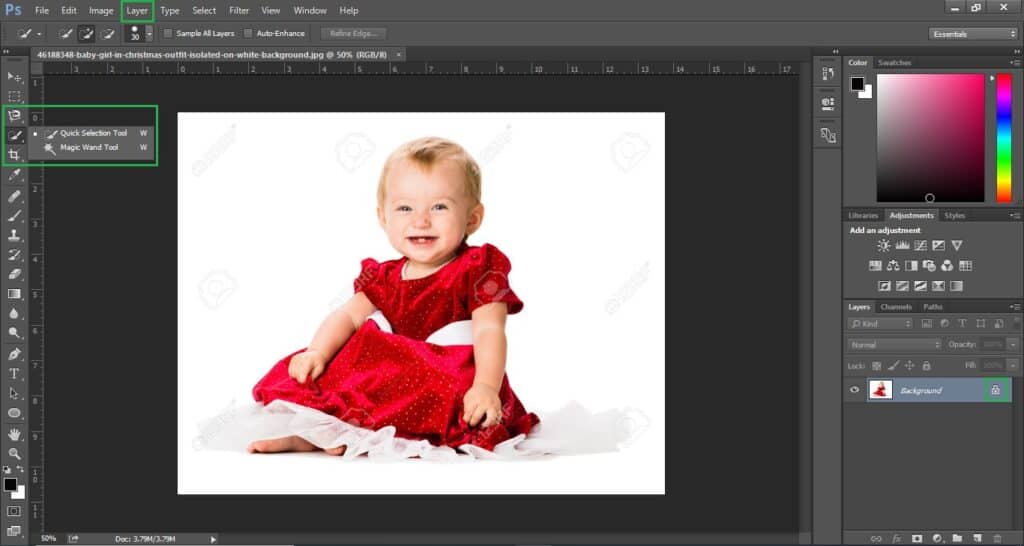
To-Do #4: How to Make the Background Transparent in Photoshop
In some design cases, especially in designing logos, placing logos in banners etc., it looks better without the background of the image on another image. Fortunately, Photoshop is super intelligent and is able to perform this easily.
Steps:
- Open Photoshop.
- Choose ‘open’ to open an existing project.
- Unlock the layer If there is a lock.
- Go to the sidebar and choose either the Magnetic Lasso Tool or Magic Wand Tool to select the area you wish to delete. Most of the time, either one will do the trick. If not, choose from other selection tools in the two buttons. This requires some logic on the part of the user.
- Right click your selection, then choose Invert to select the external area.
- After you had selected the external area you wish to delete, press Delete on your keyboard.
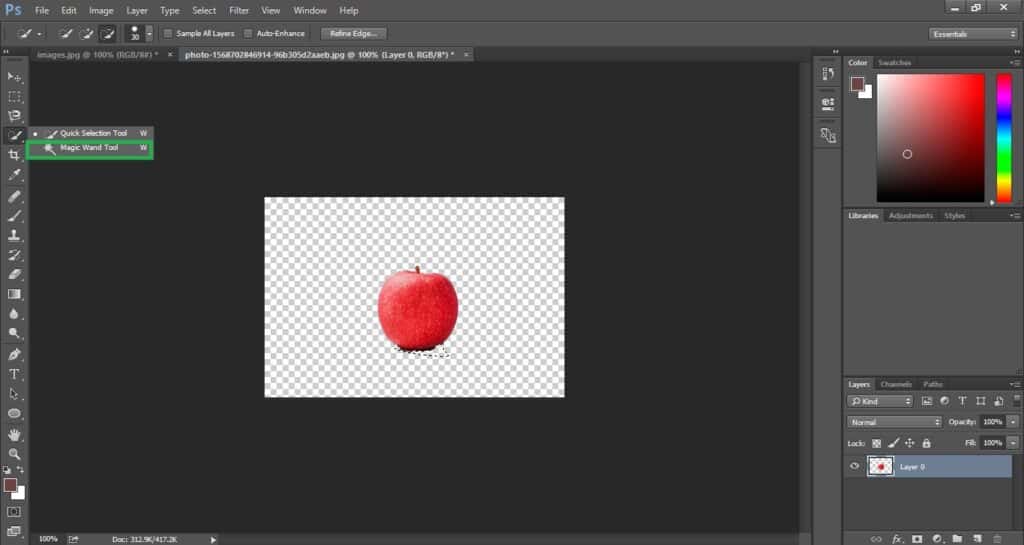
- The background had been removed. You can then decide to re-size the image following the steps in To-Do #3 or Save the work. This time, Save in PNG.
To-Do #5: How to Add Bleed in Photoshop
Bleed is the area of the project work that is set to be unprintable for the printer. It is the area where designs or unimportant designs should not appear in. Bleed is important for printing as it ensure that areas that should be printed are printed and that there is no undesired white stripe on the paper edges.
Steps:
- Open Photoshop.
- Go to file and choose ‘New’ if you wish to create a new project. If not, you can choose ‘Open’ to open an existing project.
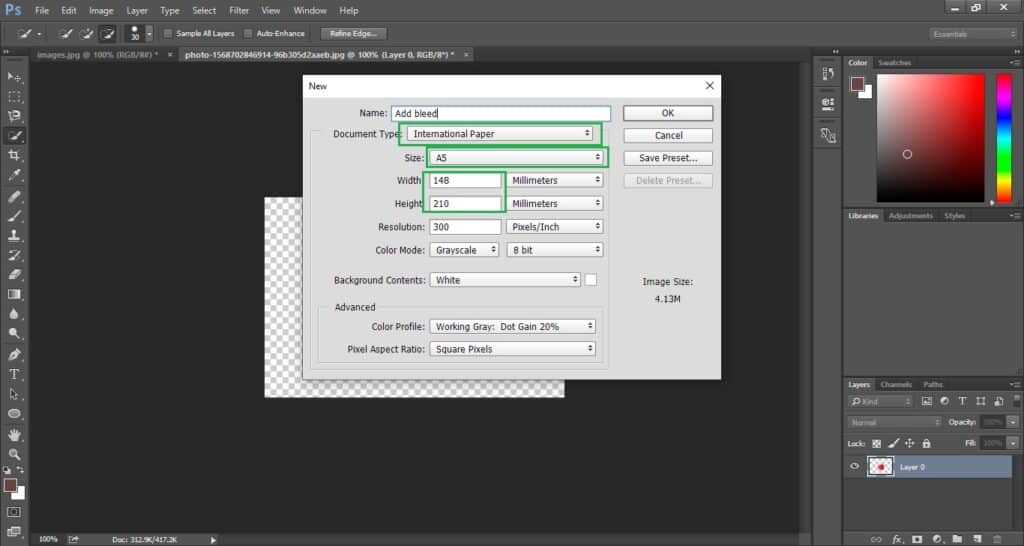
- If you are creating a new file, choose document type and set your page size. In this case, your page size should be the document size plus the bleed. If you are adding bleed to an existing project, click Image then Canvas size to key in your page size. If your expected bleed is 3mm on each size with the final printed document in A4, then your page size will be 216mm x 303mm. A Bleed table guide can be found HERE.
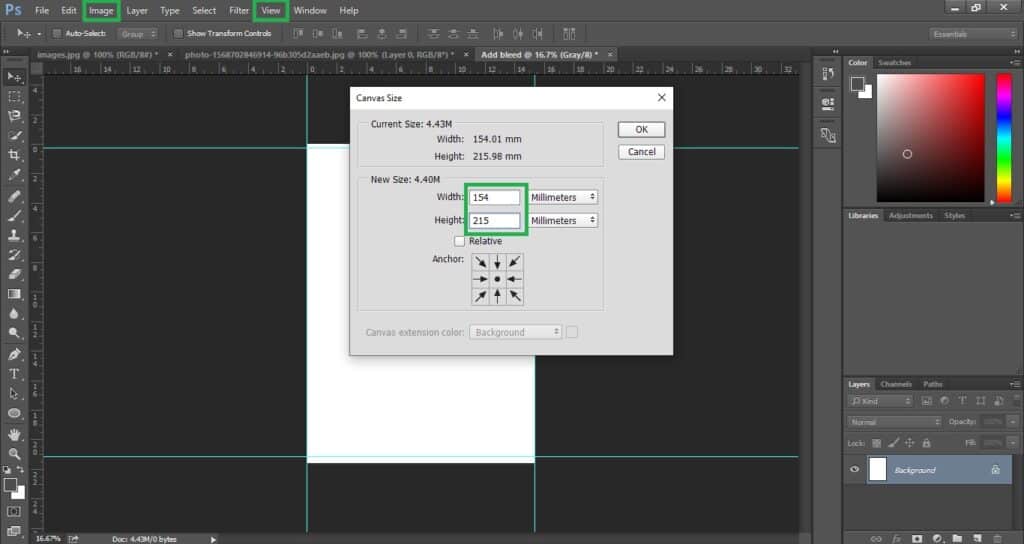
- Go to View and click on the ruler.
- Draw lines on the sides of the page to mark your bleed area. Remember that any design outside of the bleed mark will not be printed.
- If you are creating a new file, you can now drag and drop your image on the page inside the bleed area as marked by the lines.
- Save your work.
To-Do #6: How to Change Background Color in Photoshop
Steps:
- Open Photoshop.
- Go to file and choose ‘New’ if you wish to create a new project. If not, you can choose ‘Open’ to open an existing project.
- Unlock the layer if there is a lock.
- Select the image through the Selection Tool. We recommend either the Magic Wand Tool or Magnetic Lasso Tool
- Right-click your selection, then choose Invert to select the external area.
- Then, go to Layer, New Fill Layer, and click Solid Colour.
- Click OK, then select the colour you want for your background, and click OK again.
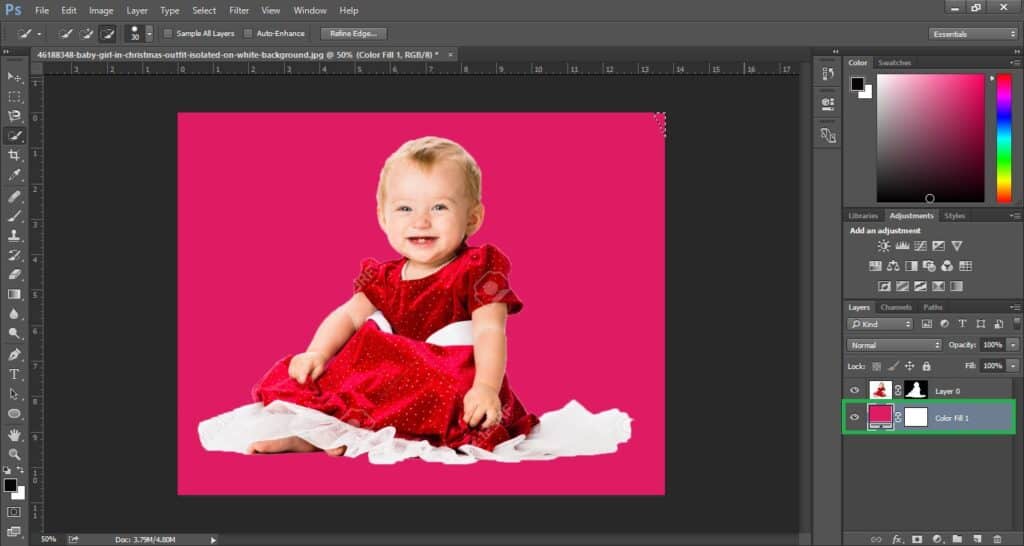
- Look for the layer on the bottom right corner, and right-click. Choose Flatten Image.
- Done! Save your work.
To-Do #7: How to Rotate the Image in Photoshop
Steps:
- Open Photoshop.
- Choose ‘Open’ to open an existing project.
- Unlock the image if required.
- Press CTRL+A to select the whole image.
- Click Edit.
- Go to Transform then click Rotate.
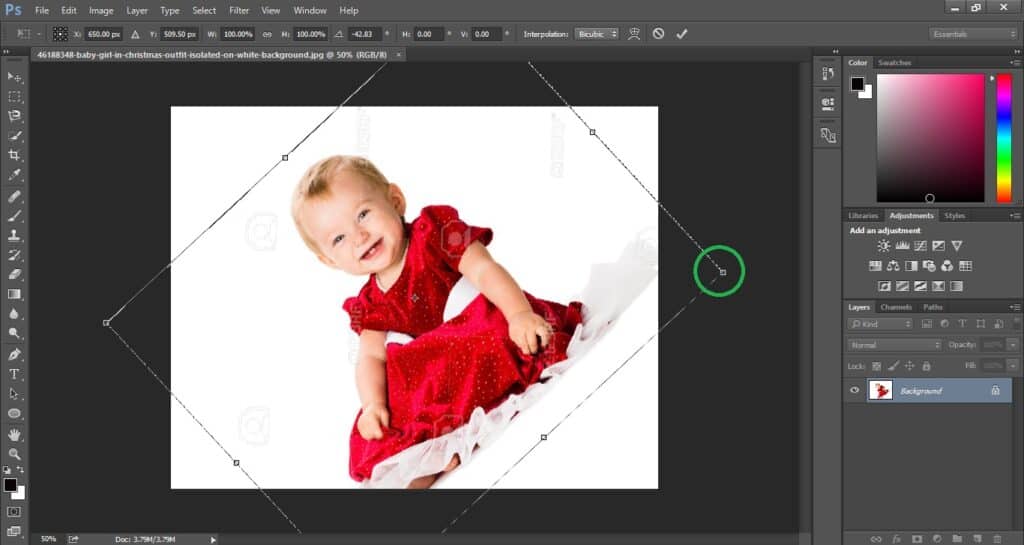
- Pick the image from the corner and then rotate to any angle you want.
- Save your work.
Final Comments
Designing with Photoshop is a lifelong skill. It requires dedication to master it. With Adobe Photoshop constantly upgrading its features and coming up with new versions, new users might actually find it easier to learn compared to a master who had been using a 10-year-old version. The steps described in this Photoshop Beginners tutorials is meant to be simple solutions rather than a comprehensive guide. You can surely explore and add on your own creativity as you follow. So, put on your learning cap as you design with Photoshop. That’s how you can improve!
Activities
Read Next! Do you know you only need 10-steps to design a flyer in Photoshop? Learn more HERE.
No subscription to Photoshop? No worries. Read about this Top Online Design Tool HERE.
Would you be keen to make videos as well? Check out this Tag.
Which To-Do did you use? Share your experience with us with a COMMENT below.
LIKE & SHARE this tutorial on your Social Channels to help us help you! HASHTAG #DonutAtwork


Great and interesting article.Thank you for sharing.