Yoast SEO Tutorial: Startout Guide to Free Plan


Running a WordPress site and looking to grow your organic traffic? Then, you got to know about Yoast SEO, a top SEO freemium tool that is also a WordPress plugin. Yes! You heard that right! Yoast SEO is freemium, so there are certain features you could take advantage of without paying a single cent. Interested to learn more? Read on for our Yoast SEO Tutorial: Startout Guide to Free Plan.

What is Yoast SEO?
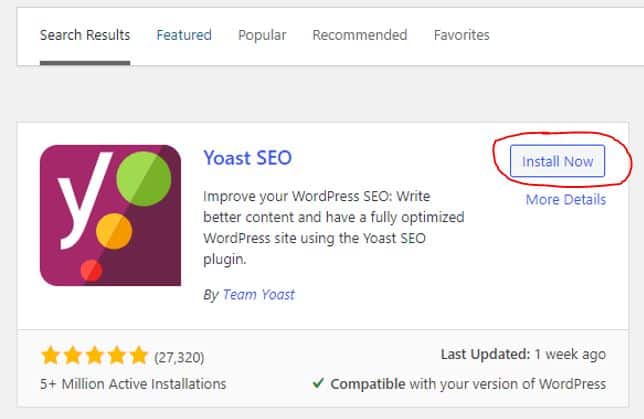
Yoast SEO is a powerful WordPress plugin to enhance a site’s SEO. The plugin is easy to use and provide suggestions to users in their on-page and off-page SEO efforts. It is the most downloaded SEO WordPress plugin that had been downloaded over 300 million times. Users needing more advanced features may opt for their Premium plan which is priced on an annual subscription at USD 89 excluding VAT per year.
Yoast SEO Free Features
A Yoast SEO free plan already comes with numerous features that offer users an advantage in their SEO efforts. What are some of these features and how to go about doing it? Read on and note our Yoast SEO tutorial steps in BOLD.
- Optimised for WordPress Editor
- Focus Keyphrase
- Preview with Google
- No-Follow and Sponsored Backlinks
- Canonical URLs
- Readability Analysis
- SEO Analysis
- Breadcrumbs Control
- Schema Markup
- Tags Settings
- Yoast SEO Academy
1. Optimised for WordPress Editor
Are you used to the WordPress classic editor? As the name sounds. The Classic editor is an old version of editor which had been phased out. Yet, users are still able to use it by installing some Classic Editor plugin. Now, if you are using any WordPress version on or after 5.0, then you must be familiar with the newer editor, called block editor. Each editor has its own interface so choosing which one to use is a matter of preference.
Nonetheless, Yoast SEO works with either editor type! Save your focus to writing the content and performing SEO with Yoast instead! If in any way you are using the Classic Editor, you can install Yoast SEO plugin without worry of crash. It works great! Promise. And it comes free!
2. Focus Keyphrase
Keyword research is the primary step before content writing. And content writing is the backbone of SEO. In every piece of content in your web pages, you need to key in the appropriate focus keyphrase to help Yoast SEO understand your content. That said, there are many things to know in choosing your focus keyphrase. To learn more, we recommend reading these two posts: Altitude Marketing and Online Media Masters. Yoast SEO has a powerful analytical system that automatically reads your text as you write. It then presents a score in the form of Readability and SEO which we will discuss further down in Point 6 and 7 respectively.
Some software such as SEMrush, SpyFu and Ahrefs have keyword research features available for free use. So, do your keyword research. Once done, and you know which focus keyphrase for your web page, you may key in the focus keyphrase in the ‘Yoast SEO’ section, under ‘SEO’ Tab, located all the way after the editor.
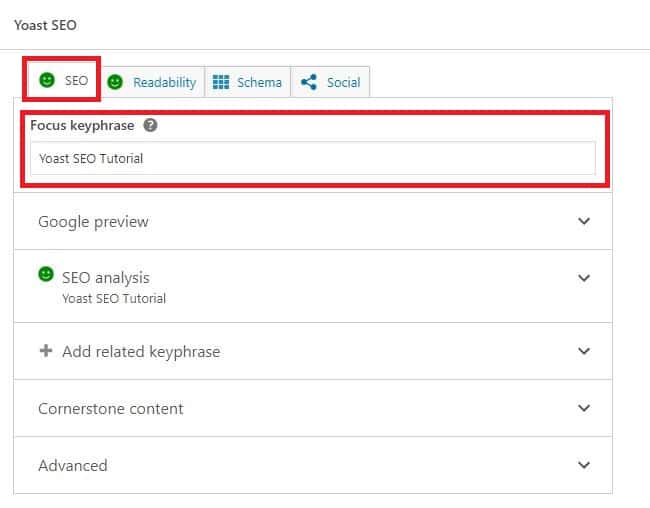
Then, you may begin writing your post. Yoast will detect the focus keyphrase where it should be at. Such as in the SEO title and meta description. Yoast will also automatically detect the recommended minimum number of times it should be mentioned in the post etc. All these will be covered in point 7, SEO Analysis.
As a free user, Yoast SEO allows one set of focus keyphrase per post. If you wish to have more than one focus keyphrase to help Yoast understand that there are other keyphrase that are similar to the keyed-in focus keyphrase, use the ‘Add Related Keyphrase’ feature which is available on Premium Plan.
3. Preview with Google
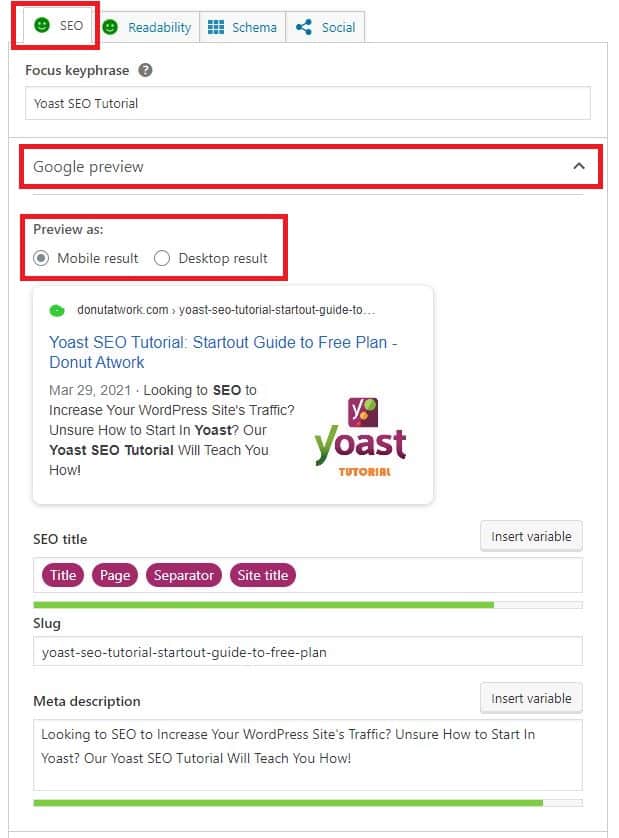
Have you published your posts and want to see how they appear in search engines result pages (SERP)? This is definitely great to be able to know because it will help a lot in your reader/user experience (UX). Sure, you want your post title and meta description to be fully showing right? Besides, by putting in the right content, including the focus keyphrase, it will help search engines determine the nature of your post’s content better.
This is how to see your page preview with Google available with Yoast SEO free. Write your content as usual in the Editor. Then, scroll down all the way below your editor to Yoast SEO under the ‘SEO’ Tab. Below the ‘Focus Keyphrase’ section, you will see a ‘Google Preview’ section. By this time, you should have keyed in the focus keyphrase. If not, key it. The focus keyphrase will help Yoast SEO assist you with writing better SEO title and meta description. Then, write your SEO title and meta description accordingly. The URL slug, aka permalink, will auto-populate from the SEO title you keyed in. You can now see a preview of how your post will be shown to others in the Google SERP mobile and desktop version.
However, if your site has a social media presence, in particular Facebook and Twitter, you can try Yoast premium to see a preview of your post in these two social networks before publishing. This feature can be found in the ‘Social’ Tab.
4. No-Follow and Sponsored Backlinks
Features such as using focus keyphrase, writing suitable meta description, readability analysis (point 6) and so many others are on-page SEO? Yes, there is another type of SEO called off-page SEO. Off-page SEO refers to having your site’s URL placed in another domain so that the domain passes the link juice to your site. This is also called backlinking. Search Engines see URL that are backlinked often as quality sites. So, with more backlinks in other domain’s, search engines will rank these sites higher. However, although no one truly knows the ranking algorithm of any search engines, it is generally accepted that search engines evaluate based on a mixture of backlinks that pass the link juice to others (aka DoFollow Links), and those that don’t (aka NoFollow, Sponsored and UGC).
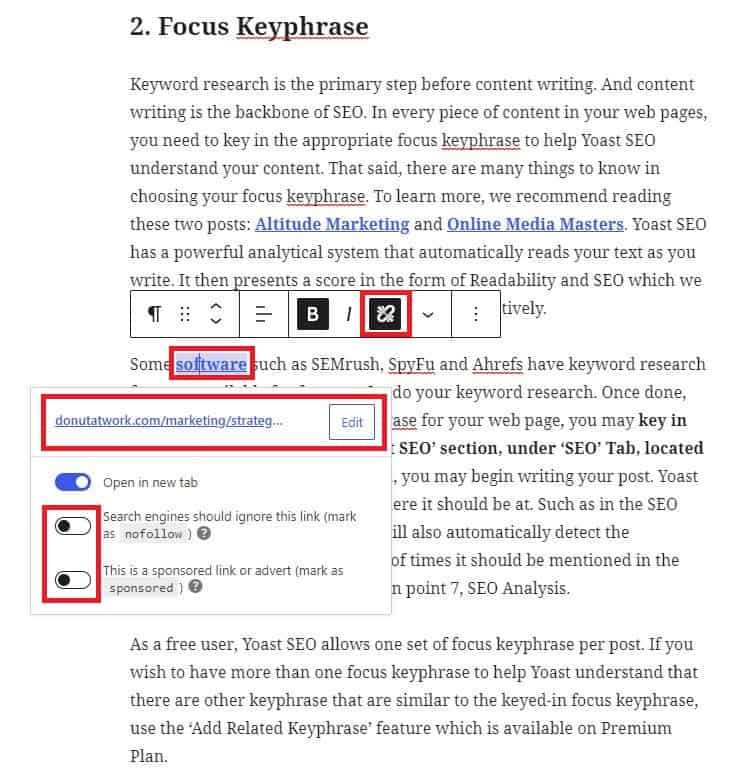
Sponsored links refer to those that are as a result of paid agreements, while UGC links refer to links inserted by the site’s readers (aka user-generated content). Hence, in writing your post, take note to include these backlinks accordingly. No worries. Yoast have these free features to allow setting the hyperlinks you set as NoFollow and Sponsored. As well, Yoast will guide you accordingly if you look under their SEO analysis (point 7)!
This is extremely easy to do! In the editor, whichever word or phrase you wish to set the hyperlink, highlight it. Then, a small toolbar will appear. Click on ‘Link’, or use ‘Ctrl+K’ on your keyboard. A small window will pop up near the highlighted word. All you need now is to mark it as ‘NoFollow’ or ‘Sponsored’. There is no need to manually set any hyperlinks as DoFollow as Yoast sets these as DoFollow by Default. That’s it! Just these simple moves will make your site more favorable to search engines.
5. Canonical URLs
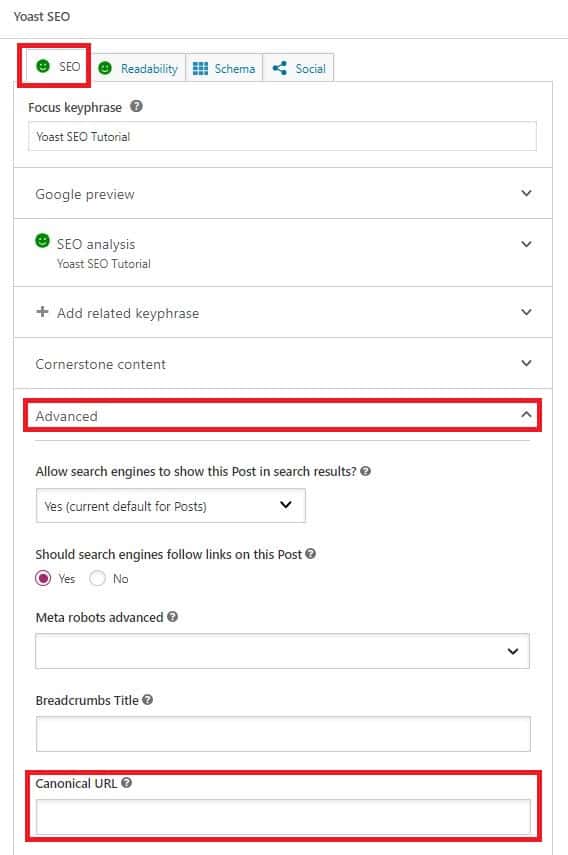
Setting URLs as canonical are important because they can break your SEO efforts if not done. They are set to tell search engines that the content of that post comes originally from another post or site. This helps prevent search engines from labeling your site as ‘low-quality’ plagiarism site which will surely affect SERP rankings. Similarly, when you have multiple posts with similar content in your site, you have to set canonical URLs of that original post accordingly. Setting canonical URLs will also ensure that any link juice are passed back to that original link.
Here is how to do it! Scroll down to your Yoast SEO section. In the ‘SEO’ tab, at the bottom, expand the ‘Advanced’ section. You will see the ‘Canonical URL’ box. Key in the URL of the original post. That’s it! Not important if you do not have similar posts. But if you have, you must remember to do it!
6. Readability Analysis
Readability is the ease of reading and understanding an article. Articles which are easy on the eyes and minds of readers are more appreciated, unless of course if the article is academic in nature. Good readability helps in generating readership and forge recurring subscribers. Hence, readability affects website traffic overall. Additionally, search engines tend to rank articles with good readability higher since they can index it better to inform their content and intent.
How is readability measured? The industry standard here is the Flesch Reading Ease which has a range between 1 (hardest to read) to 100 (easiest to read). If your article has a score of 90 to 100, then it can mean that it is easily understood by 11-year-olds. Alternatively, if you score 0 to 30, then your article is likely going to be understood by college graduates. Not to worry about the Flesch Score Chart. Although, you need to know what you need to do in your writing to get a higher score. Such as shorter sentences, word limit per paragraph, and lesser difficult words etc.
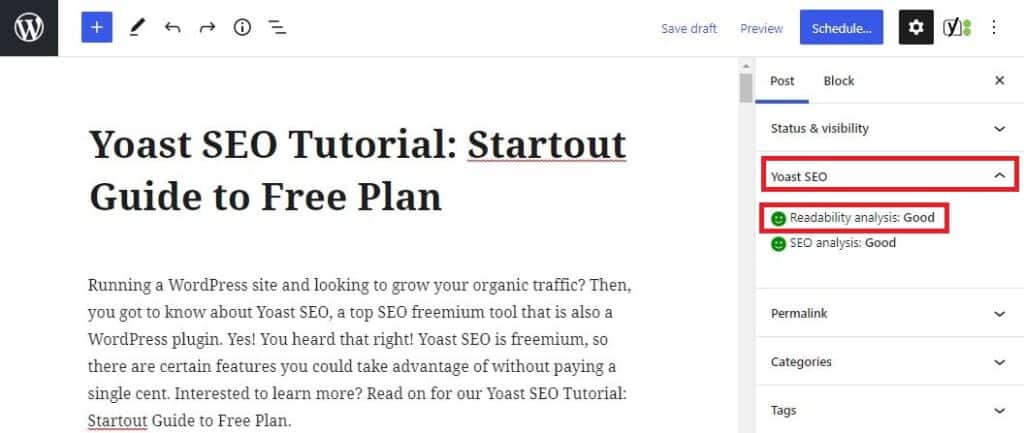
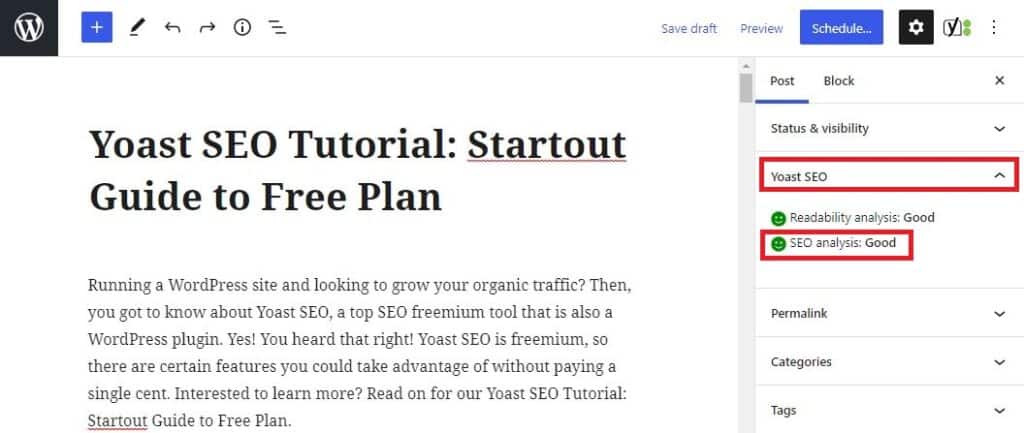
Luckily, Yoast SEO makes optimizing for readability easy with their built-in Flesch Score analysis. After you have written your full post in the editor, look towards the column on the right for a ‘Readability analysis’ and a small face. If the face is green, and score is ‘Good’, then your post had scored 60 and above in Flesch.
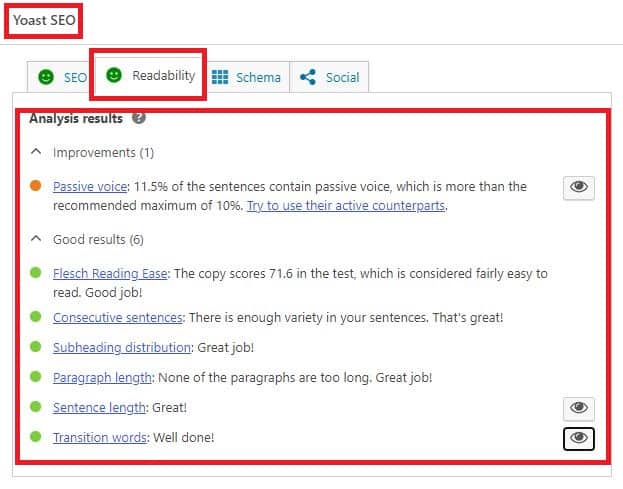
If you got an orange or red face, don’t fret. Scroll down to the Yoast SEO section and navigate to the ‘Readability’ Tab. There you will be able to see the analysis results and suggestions to improve. Click on the links and work on each point until you get a ‘Green’ face!
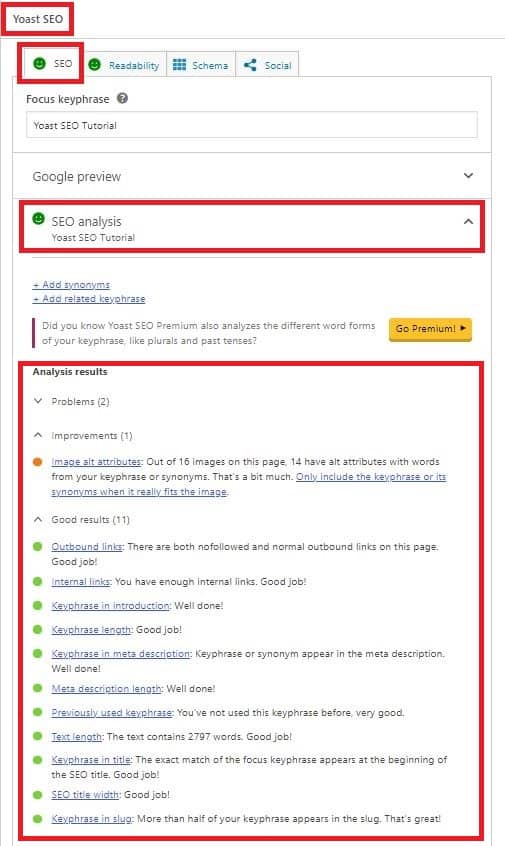
7. SEO Analysis
In a similar fashion, except that this feature will analyse your post for its SEO factors instead. There are a number of factors that Yoast analyses and this article will never make full sense of it. We suggest you to check out on your own in Yoast’s website.
Here is where to find SEO analysis in Yoast. You may have already noticed! Ensure your post is written. Then look on the right column (where you find ‘Readability analysis’). Likewise, to readability analysis, Yoast provides a rating and a face. If you do not see a ‘Good’ and green face, then there is work to do to maximize your post for SEO.
Scroll down below your editor. In the Yoast SEO section, look for the ‘SEO’ tab (beside ‘readability’ tab). Below ‘Meta description’, you will find the green face and ‘SEO analysis’. Then, click on the small downward pointing arrow to expand it. Ta-da! You will see the various suggestions from Yoast on how to improve your post.
Now you know there is so much to learn in Yoast SEO. The best thing is? Yoast also makes it easy for you to learn on the job! If you always want to learn more, check out the Yoast Academy. We also covered this in out last point, 11.
8. Breadcrumbs Control
Breadcrumbs sets the structure of your post to inform your readers where they are, helping them to navigate. Technically, this means longer website retention and lower bounce rates. Most importantly, search engines use them for the same purpose too and they might even show them in SERP!
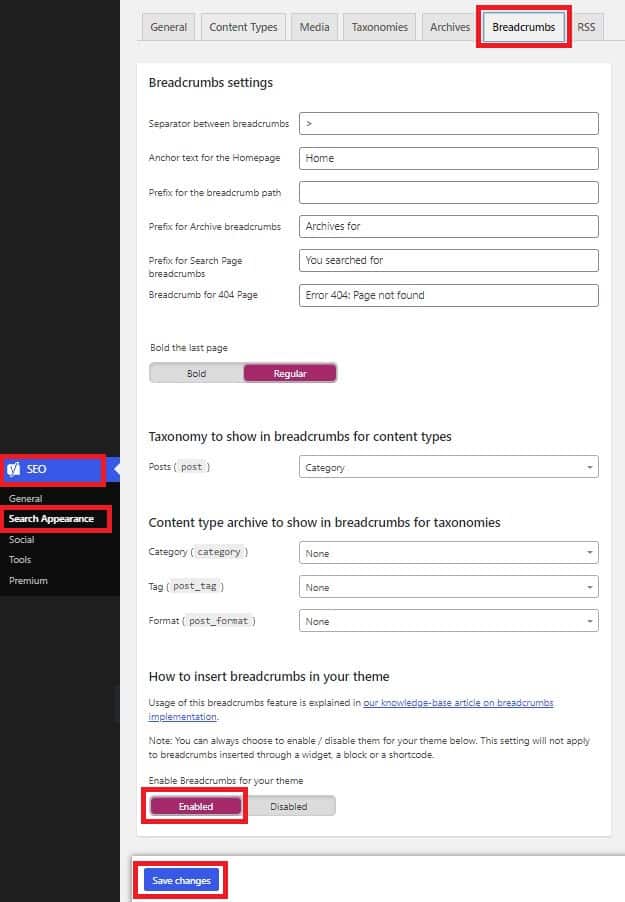
The breadcrumb setting with Yoast is a site-wide setting. So, access it via the WordPress left-hand column toolbar. Look for ‘SEO’ where Yoast’s logo is also placed beside. Hover your mouse on ‘SEO’ and a small toolbox with ‘Search Appearance’ will expand. Click on ‘Search Appearance’. Then, click on the ‘Breadcrumbs’ tab. Scroll down to the bottom and ‘Enabled’ breadcrumbs for your theme. Near the bottom of the page, click ‘Save Changes’. Breadcrumbs is now enabled! You can decide to set the taxonomy of your post which can be, for instance, by category, tag, format, or any structure that your WordPress theme support.
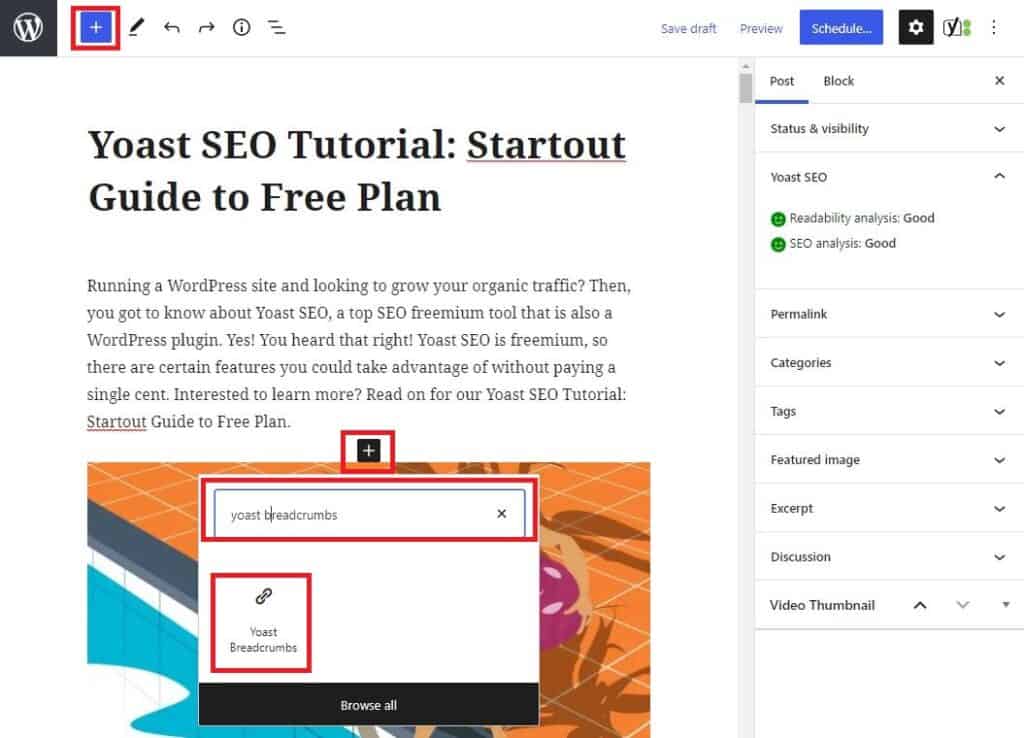
That’s not all! To further enhance page-to-page navigation, you may wish to input a breadcrumbs block directly into the post. Yes, you can add into all your post if you like. Go to your post editor. Add ‘Block’ as usual like how you would write your post by pointing your mouse near the middle of the page, or use the top left-hand corner ‘Plus’ button. Then, key in the searchbox, ‘Yoast Breadcrumbs’. Click on it to add the Yoast Breadcrumbs Block. How the breadcrumbs is structured is based on the site-wide setting you set. If you wish to learn more Breadcrumbs, we suggest this BLOG.
9. Schema Markup
Another feature that helps search engines understand your site better is Schema Markup. Schema basically tells these search engines what your site is directly rather than have them determine on their own base on their algorithm. This reduces errors and hence, can result in better rankings.
There are site-wide and individual post schema settings. The right way is to set a default page and article type in the site-wide settings. Then, in any page or post of a different type from the default, change their schema accordingly. Some schema to note is the ‘About’ page, ‘Contact’ page, ‘FAQ page, ‘Profile’ and ‘Checkout’ page.
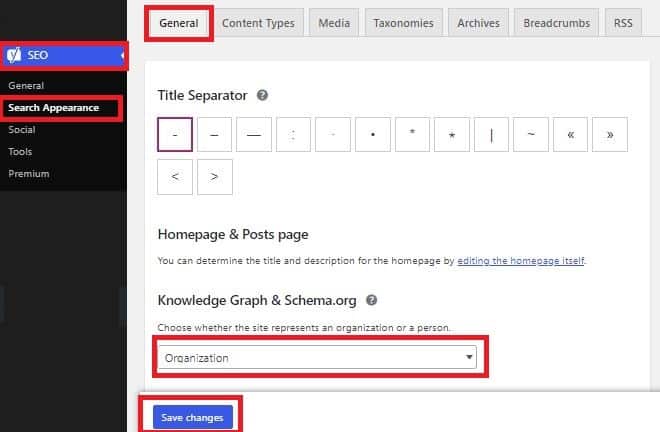
To set the site-wide schema, hover first to ‘SEO’ in the left-hand WordPress toolbar. When the small toolbox appear, click on ‘Search Appearance’. In the ‘General’ tab, look for ‘Knowledge Graph & Schema.org’ and set if your site represents an ‘Organisation’, or ‘Person’.
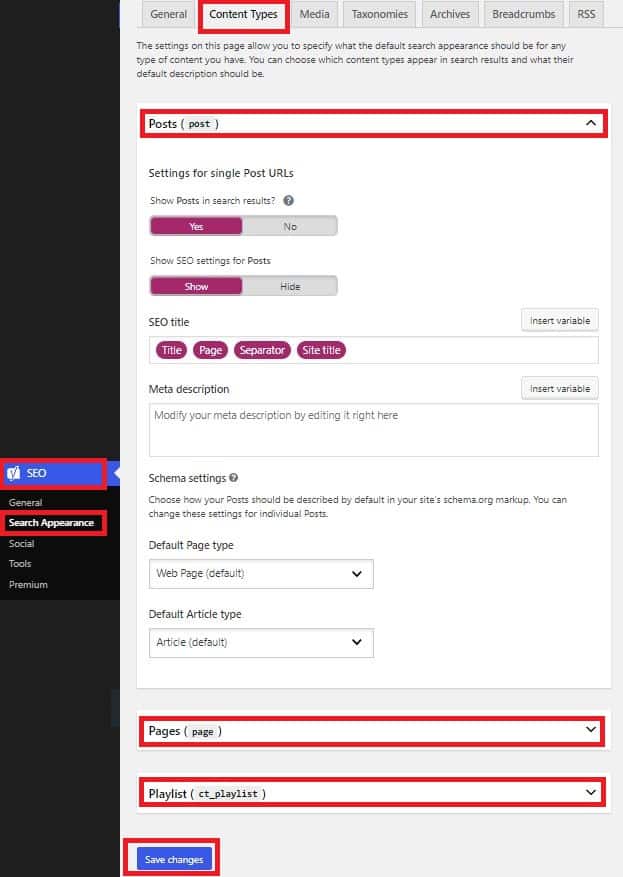
Then, click the ‘Content Types’ tab. Three type of content will show respectively. They are ‘Post’, ‘Pages’, and ‘Playlist’. Expand each of these and set the default schema you want under the ‘Default Page Type’, and ‘Default Article Type’. Once done, click ‘Save Changes’. If you are unsure, read about schema in Yoast before doing these as improper changing of schema can cause errors!
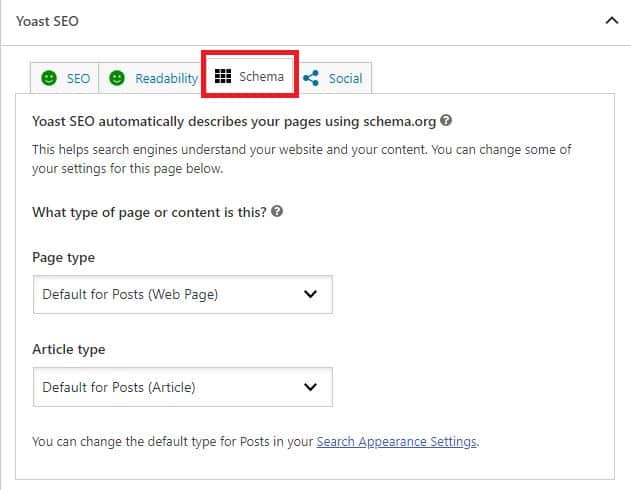
To set individual page or post schema, go to that particular page or post. Scroll down below to the ‘Yoast SEO’ section. Then click the ‘Schema’ tab. There it is! You can now set the schema you want! Sweet and easy right?
10. Tags Settings
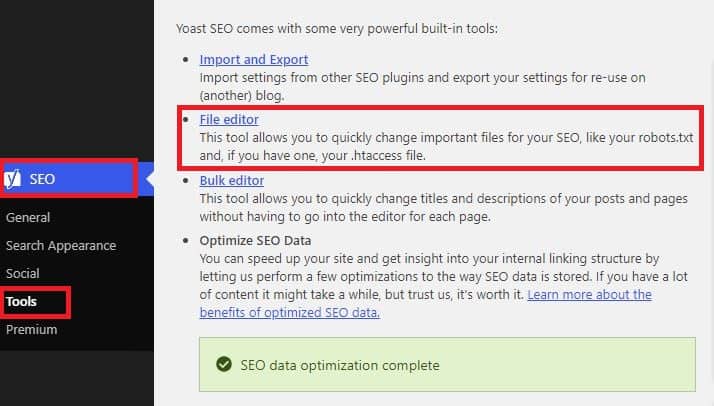
This feature is for the advanced users. If you are new, or even you had read a great deal about it, we do not recommend you to edit it. Basically, Yoast SEO contains some documents that controls where your site gets indexed by search engines. This runs backend by default. But due to technical settings, these files may at times need to be edited for better indexing.
Again, do this at your own risk. If you need to, this is how to locate the files namely robots.txt and .htaccess. Hover to ‘SEO’ in the left-hand WordPress toolbar. When the toolbox expands, click on ‘Tools’. Scroll down and go to ‘File Editor’. You will see both files there if you have it.
11. Yoast SEO Academy
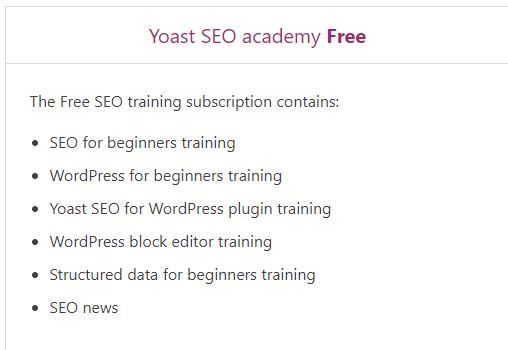
Yoast SEO is truly a top SEO tool and they showed why with their own Yoast SEO Academy courses. They support their users and make sure they are equipped with the knowledge to make SEO possible with Yoast SEO. Free users get access to a limited number of online resources but its more than sufficient because it covers everything the free subscription provides. Unless of course you wish to take on a Premium plan.
Yoast SEO Academy courses can be accessed by creating an account here: https://yoast.com/academy/. If there are any more resources you need, you know you can check back our site for more!
Final Thoughts
If you are running a site hosted in WordPress and looking to increase organic traffic, then you need to try Yoast SEO. Yoast SEO comes with a number of free features that users can use for their SEO boost. We prepare this Yoast SEO tutorial to cover most of these free features, and notably the impactful ones. We hope it goes a long way to your SEO journey. One day, we hope we can be learning from your very own Yoast SEO tutorial. Afterall, the knowledge base of SEO is huge and ever-changing. It is a continual work-in-progress!

Activities
Have you tried out this Yoast SEO tutorial yet? Share your feedbacks with a COMMENT below.
WordPress is the most popular CMS in the world with over 400 million users! LIKE & SHARE this article with them!
HASHTAG #DonutAtwork
Read Next: Beat the limitations of Yoast Free HERE and everything in this SEO Tag.