Movavi Photo Editor: More How-Tos in Step-by-Step


Hey You, Graphic Designer! Or not?
Whatever! How is your image editing work coming along? It’s hard in this age, we know. Especially when you are a Social Media Manager. Nonetheless, whether you are using Movavi Photo Editor aka Picverse or not, this tutorial could perhaps shed light into how many photo editors work!
By the way, Picverse is a photo editor, not a graphic editor capable of producing flyers, Resume or other heavy duty graphic design product. Yet, Picverse from Movavi can be very useful and powerful, as if you are good with it, will save you tons of time and effort. So, get moving and learn along.
Get a FREE TRIAL and try it out! This tutorial is here with you, and made in supplementary to the Official Movavi How-Tos and User Guide.
Its SIMPLER than you think! Anyone can be a Designer with Movavi! Here goes!
The world wide web is huge, and yet you had stumbled on my site looking for something. I hope you find it as we had taken huge efforts to create them. Best of all, its FREE! Hence, some of our content may include affiliate links (i.e. whenever you click on the links and purchase, I earn a small commission at no extra costs to you!). No worries! Some of these links may look like phishing, but I assure you they are not! Lastly, the affiliation does not affect my reviews towards them. Enjoy!
Movavi Photo Editor Tutorial
- Add Watermark
- Add in Objects
- Convert Between Formats or Compress Photo to Get Smaller Size
- Remove Red-Eyes
- Blend 2 Photos
- Blur Certain Areas to Create Focus
- Commonly Used Shortcuts
1. Add Watermark
There are two methods to add a watermark to your photo in the Movavi Photo Editor.
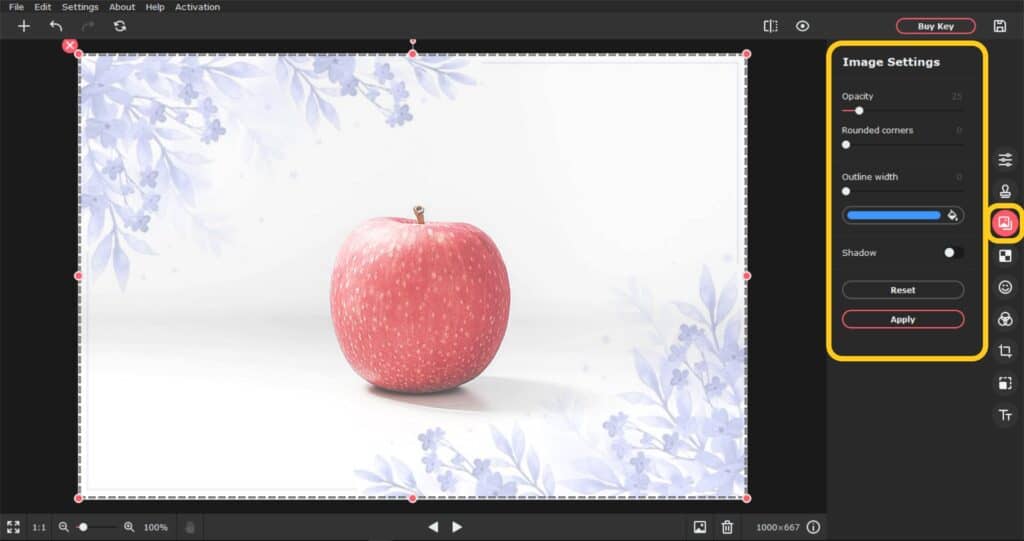
1.1. Image Watermark
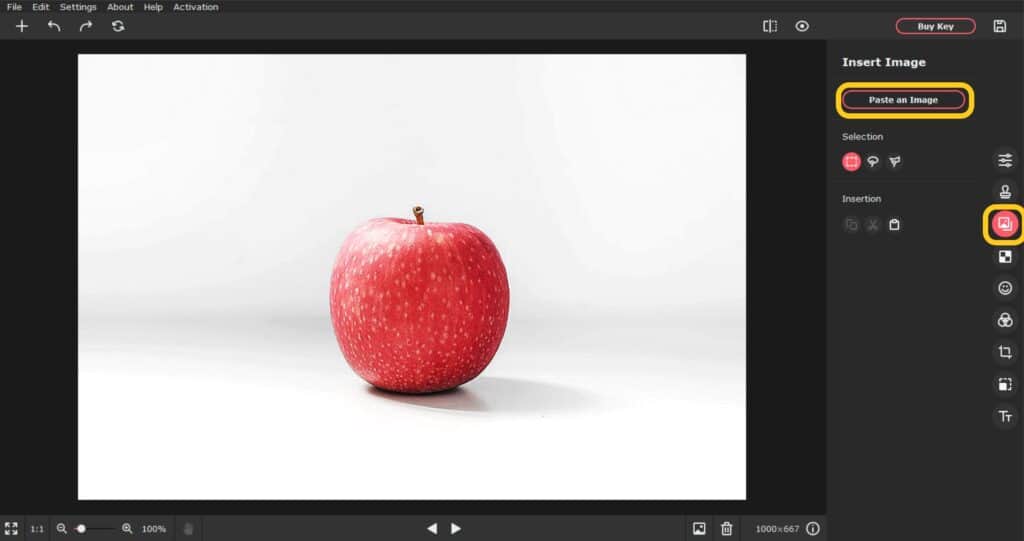
- From the right-hand vertical panel, select the “Insert Image” tool.
- Click “Paste an Image” to open an explorer window. Select your preferred image and click the “Open” button.
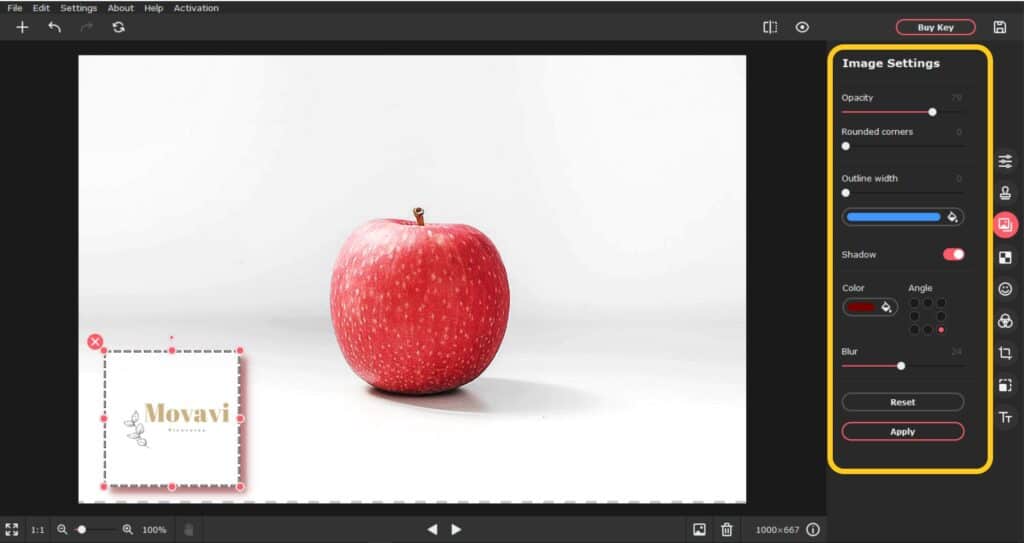
- Once you paste the image from the computer, an “Image Settings” panel will appear.
Here, you can make the desired adjustments to your image watermark, including Opacity, shadow, and so on.
- Click “Apply” to save the edit.
1.2. Text Watermark
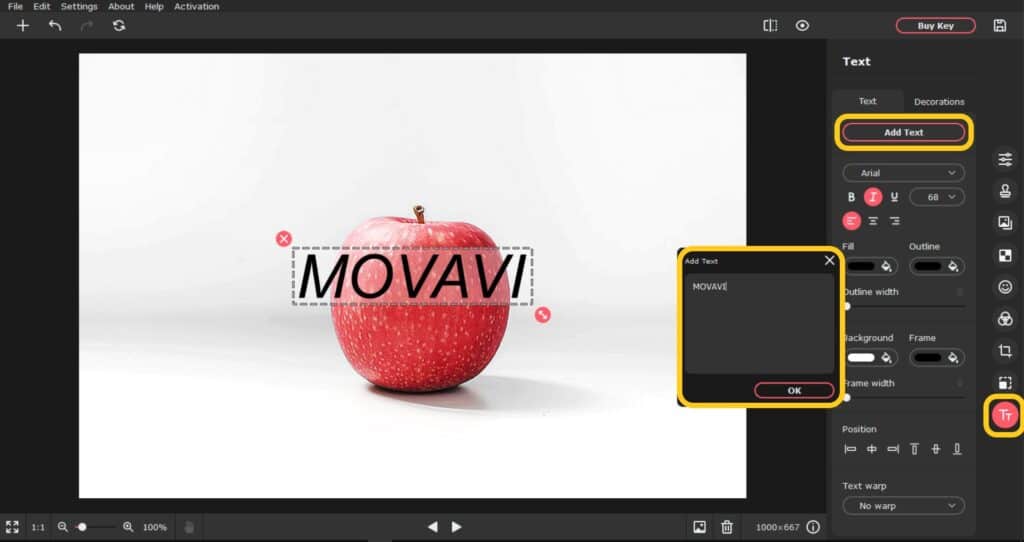
- Click the “Text” tool from the right-hand vertical panel.
- Add a designated text that you want as a watermark. And then, adjust the opacity, font size, font style, and colour scheme as you like.
2. Add in Objects
(Comments) Adding objects or images is exactly similar to the above process.
- Select the “Insert Image” tab from the vertical panel and click “Paste an Image.” The Windows file explorer will open.
- Choose the image or object from your computer and click “Open.” Once you paste the object from the computer to the Movavi Photo Editor, make coveted adjustments or editing.
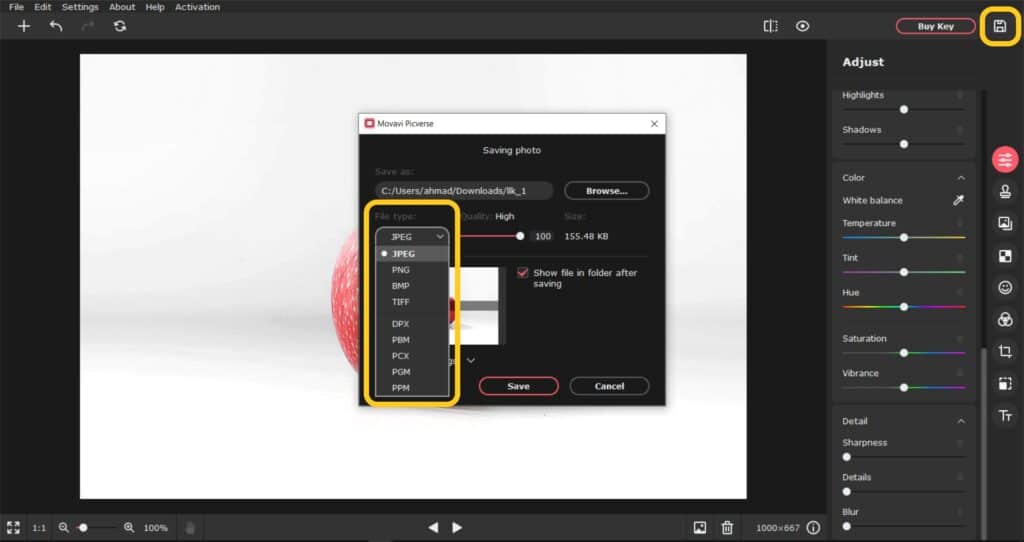
3. Convert Between Formats or Compress Photo to Get Smaller Size
- Open your Movavi Photo Editor and edit an image of your choice.
- After editing, head over to the top right corner and click the “Save” icon.
- The “Saving Photo dialogue box” will appear. Here, you can change the image format(file type) and quality as you like.
4. Remove Red-Eyes
- Click on the “Retouching” icon (smiley face) from the right-hand vertical panel.
- Select the “Red Eye Removal” option from the “Eyes” section.
- Click on “Remove Automatically” to erase the red-eyes effect automatically.
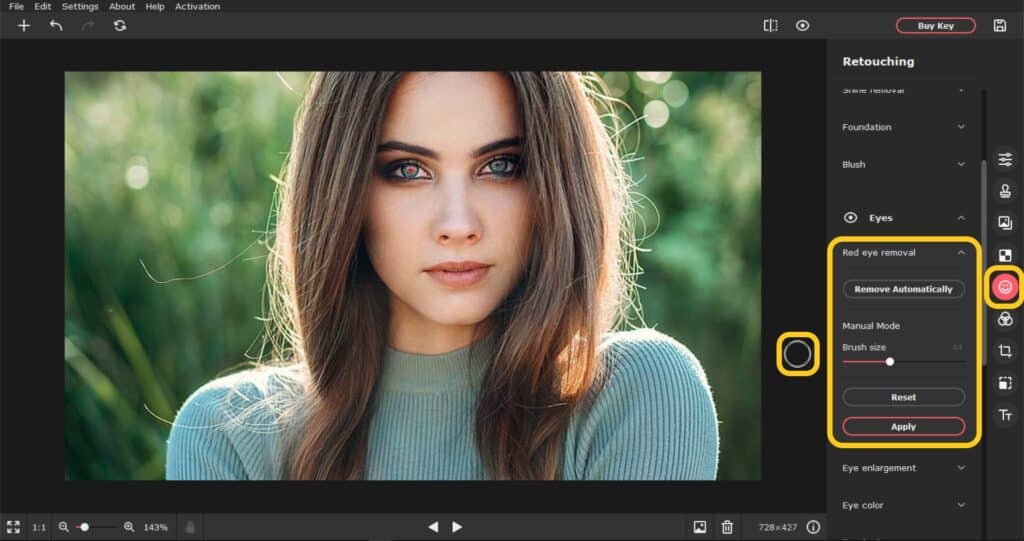
- (Optional): You can also remove red-eyes using the manual mode. For this, use the Brush Size slider to adjust the brush size, place the brush onto the pupil, and click it. The round brush will instantly remove the red-eye.
- Click “Apply” to save the edit.
5. Blend 2 Images
(Comments) As we mention before, Picverse is a photo editor. It is not capable of very advanced editing techniques. Hence, in order to blend 2 images with this software, we can only use the ‘opacity’ tool. However, we can advise here that the image that you need to make opaque, be lighter in colour than the other. Try it out!
- To blend two pictures, click the “Insert Image” icon from the right-hand panel and tap “Paste an Image.” The Windows or File Explorer will open.
(Comments) i.e. Select the image that you want to blend with the current one and click “Open.”
- Once you paste the image, the “Image Settings” panel will appear on the right side of the Movavi Photo Editor.
- Here, the “Opacity” feature will do its job to blend the two images or add an overlay effect. So, move the Opacity slider until the image is sufficiently transparent.
(Tips) Besides opacity, you can adjust the corner, width, or shadow of your photo. However, we don’t recommend using these features if your main focus is to get a good blend.
- Click “Apply” to save the edit.
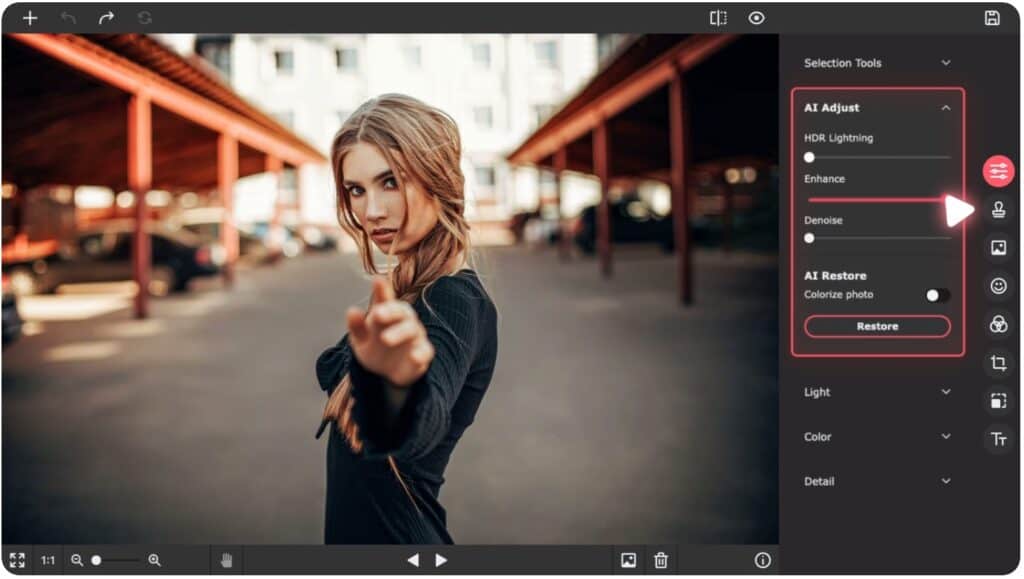
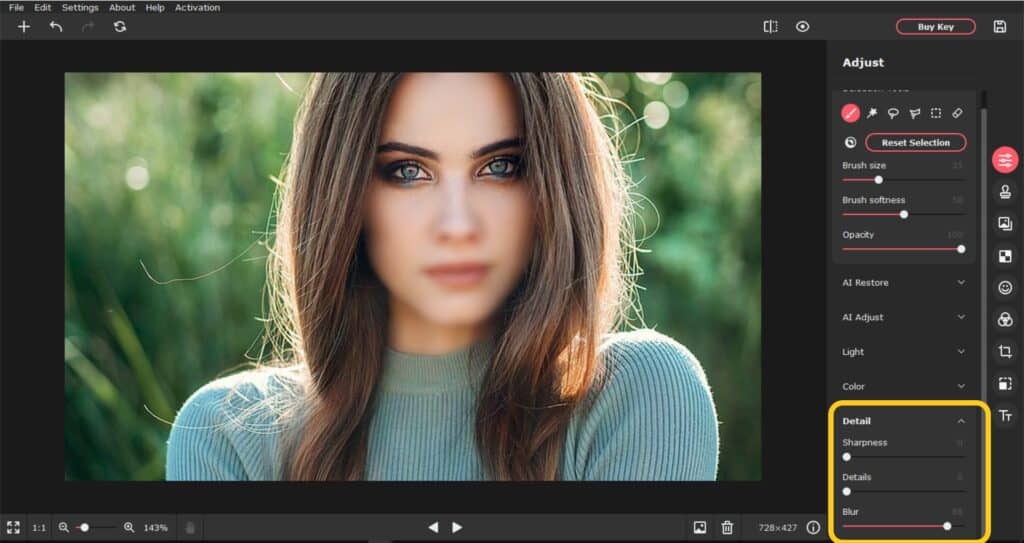
6. Blur Certain Areas to Create Focus?
- Before you blur a certain area, you need to select it first. And that’s where the selection tools come in. Go to the “Adjust” icon and click open the “Selection Tools” section.
- Select the “Selection Brush” or “Lasso tool,” as they are handy, and mark the areas that you want to blur to create focus.
(Comments) For example, in the image below, we’ve used the “Selection Brush” and marked the forehead and mouth to focus on the eyes.
(Tips) You can also adjust the brush size and softness for better selection. Use the “Selection Eraser” to undo a part of the selected area.
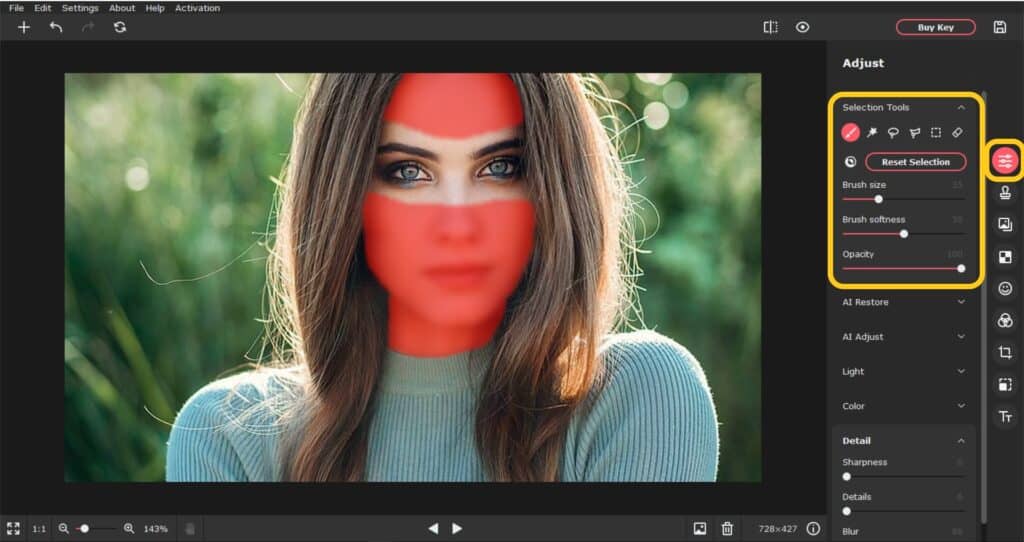
- Move the “Blur” slider in the “Detail” section until you get your desired results.
- Click the “Save” on the top right corner. Change the file name, type, or quality, and tap “Ok” to save the edit.
7. Commonly Used Shortcuts
Movavi Photo Editor gives you a list of keyboard shortcuts that you can find in the Settings > Keyboard Shortcuts in the top left corner of the editor.
Some of the common shortcuts are:
- Ctrl+S to save the edit
- Ctrl+O to open the file explorer
- Ctrl+Z to undo an action
- Ctrl+A to view “Before and After” of an image
- ESC to reset selection
Final Remarks
Tried it out yet? Yes, its actually so easy! Credit to the makers of Movavi! If you are involved in video editing work, or need a screen recorder software too, be sure to check out Movavi’s website. There is an all-in-one bundle too available on a yearly subscription price!
The journey in design and editing is huge and vast. Only constantly learning and re-learning will truly define a professional. Above all, learning without application is technically useless. Try out this software. That’s our one advice for you to take away.
Activities
What photo editor are you using at the moment. How is it different from Movavi Photo Editor? Share with us with a COMMENT below.
The current Social Media Managers and Marketers do a lot of design work too! LIKE & SHARE this article across!
HASHTAG #DonutAtwork
Here are some Tags you need to check out: Creative Development | Photoshop | Stock Library